Upload, Insert & Publish Images
Images are important, but they are NOT the most important part of your pages. Images must serve a purpose on the web. Your images should deliver a sense of place to future students.
Size
- General rule: No larger than 600 px wide and 1 MB.
- Large images make the pages slower to load, and certain browsers will always display the image at full-size.
- Before uploading and inserting images, they should be resized to be as close as possible to the size the images should be viewed.

Steps to Add Images to Modern Campus CMS
Upload a new image
If you are working on adding a new image that is not already in your department's Modern Campus CMS images folder, such as a headshot of a new employee, you will need to follow these steps to upload it:
- In Edit Mode, place your cursor where the picture needs to be inserted.
- Click the Insert/Edit Image Icon icon on the second row of the toolbar.
- Click the Source button icon to the right of the Source field.
- Click the blue Upload button in the upper right-hand corner.
- Click the +Add button.
- Select the image file you would like to add from your computer files.
- Click Open.
- Rename the file to comply with file naming conventions. (all lowercase, hyphens instead of spaces, no special characters)
- If you are uploading a file with the same filename as an existing file, you will need to check the "Overwrite Existing" box and then click the "Start Upload" button. Example: a staff member in your department has a new headshot photo that needs to overwrite the older photo.
- Click Start Upload.
- The new image file will appear in the images folder list.
(Note: If an image is not appearing correctly after inserting, follow steps to publish.)
You can upload multiple images at a time.
Insert an existing image on your page
- Navigate to the direct editable region where you want your image to appear on your page.
- Click the Insert/Edit Image Icon icon on the second row of the toolbar.
- Click the Source button icon to the right of the Source field.
- Find and click the image file name.
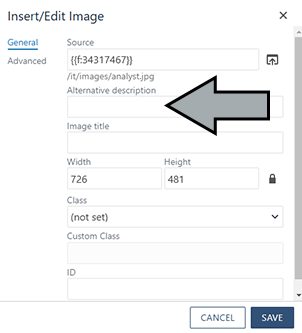
- Describe the image's message with text in the Alternative Description field. Descriptive text is required here to meet accessibility guidelines.
- Click Save. Your image should appear in the Editor where your cursor was placed.
Publish an image file
After you add upload or edit a new image, you should publish the image file to make the changes live and viewable to your web page's visitors. Follow these steps to publish your image file:
- On the global Modern Campus CMS Navigation, Click Content.

- Click Pages.
- Find and click your directory's Images folder. (Note: usually your files will be listed in alphabetical order, but you can also find files using the Filter.)
- Find and Click the name of the file you would like to Publish.
- Save any changes made.
- Click Publish.
- Click Publish in the dialog box to confirm. (Note: We do not require Version Descriptions of images, but you might find it helpful if you have multiple versions of the same image.)
Image Resources
Photo Archive
Editing Software
It is always best to edit your images prior to uploading them to Modern Campus CMS. Modern Campus CMS has an Image Editor, but software such as Photoshop and Pixlr will provide for higher quality edited images.
Videos
All videos should be housed on a university sponsored YouTube account. Please contact Communications & Marketing for more information.