
How to Edit in Modern Campus CMS
Learning how to edit your page and text in Modern Campus CMS is one of the most valuable skills you can learn.
Follow these Guidelines
- Before editing a live page or before submitting a content update request, always have your content written and approved (by your department).
- Follow Content Guidelines, Accessibility Standards, and Know Your Audience
Tips
- A file needs to be unlocked and able to be checked out to edit
- Use the green direct edit buttons to edit the content directly below them
- Get to know the toolbar and make sure to strip formatting when pasting in text
- Learn how to add a link
Keep these functions in mind on your journey to adding and editing content:
Edit a Page
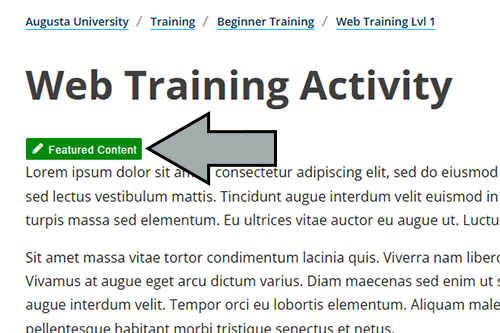
Use the green direct edit buttons to get started.
Add & Edit Text
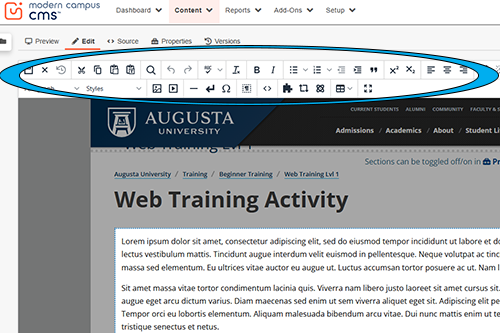
The toolbar mimics commonly used word processing software with some specialized buttons unique to Modern Campus CMS.
How to Edit a Page
There are multiple ways to navigate to a page to edit it. To edit a page, first it must be available to be checked out to you.
Direct Edit Function
In Edit Mode, click a green direct edit region button. Note: Clicking the green direct edit buttons will "check out" the page if unlocked.
Page Properties & More
To access the page properties and other functions, click the lightbulb to check the page out instead of using the green direct edit buttons.
Access Through Your Folder
To access your directory, click the File Navigation button (folder icon) in the upper left just under the Modern Campus CMS logo, which will open a split screen view of your web directory files.
- In the folder structure view, you can navigate through directories of the website
- To edit a page or its properties, first click its .pcf file, then check the page out
How to Edit Text
To edit a content region, click its green direct edit button. This will open a WYSIWYG (What-You-See-is-What-You-Get) editor.
- WYSIWYG editors allow you to add, delete, or modify content without HTML
- This editor will be similar to most word processing software, such as Microsoft Word
- The toolbar will have some options you are familiar with, with a few unique to Modern Campus CMS
- Clear your formatting remove-format icon when pasting in text from outside of Modern Campus CMS (such as from a Word document)
- Review how to Insert/Edit hyperlinks
Once you have completed your edits, click the Save button to return to the page preview screen. If you wish to return to the folder
structure view without saving your work, click the File Navigation button in the upper left-hand corner. Don't forget to "check in" the page if your
work is complete ("check in" automatically occurs when you "Publish" the file).
Toolbar
Learn what each button represents on the toolbar and see examples of how to use them.
Use shortcuts to help you edit text quickly as you get used to Modern Campus CMS.

save icon
Save
Click on the Save icon to save your changes to the current page. The page will not
be live on the website until after it is published.
To save without exiting Edit mode, click "CTRL + S" for Windows, or "CMD+ S" for Mac.
times icon
Exit Without Saving
Exits the Edit Mode without saving any changes.
clock-rotate-left icon
Restore Last Draft
Restores the content to the last saved point, including auto-saves.
cut icon
Cut
Removes content from a document. To do this, highlight the content and click the "Cut"
icon.
Keyboard shortcut: "CTRL + X"
Many browsers disable the use of Cut, Copy, and Paste commands for security purposes. This is not a problem with Modern Campus CMS - this is a browser issue.
copy icon
Copy
Copies content from the page. To do this, highlight the content and click the "Copy"
icon.
Keyboard shortcut: "CTRL + C"
Many browsers disable the use of Cut, Copy, and Paste commands for security purposes. This is not a problem with Modern Campus CMS - this is a browser issue.
paste icon
Paste
Pastes copied content onto a page. To do this, click where the content should be placed,
and click the "Paste" icon.
Keyboard shortcut: "CTRL + V"
Many browsers disable the use of Cut, Copy, and Paste commands for security purposes. This is not a problem with Modern Campus CMS - this is a browser issue.
Paste as Plain Text
Pastes copied content onto a page while removing all formatting of the text. To do this, click where the content should be placed, and click the "Paste as Plain Text" icon.
search icon
Find and Replace
Allows the user to find certain text on the current page and replace it with other text.
undo icon
Undo
Undo the last changes made, one by one.
Keyboard shortcut: "CTRL + Z"
redo icon
Redo
Redo the changes that were previously undone.
Keyboard shortcut: "CTRL + Y"
spell-check icon
Spellcheck
Checks the spelling of the editable section. Misspelled words are underlined with a red line, and clicking on the word will give the following options:
- list of suggested words to replace the misspelled word
- add the word to the dictionary
- ignore misspelled word
- ignore all instances of misspelled word in the editable section
remove-format icon
Clear Formatting
Removes all formatting applied to the text. To do this, highlight the text to be updated and click the "Clear Formatting" icon. This returns the selected text to the default format settings.
bold icon
Bold
Turns selected text into Bold text.
italic icon
Italic
Turns selected text into Italic text.
list icon
Bulleted List
Turns the selected text into a bulleted list. Example:
- Apples
- Bananas
- Cherries
list-ol icon
Numbered List
Turns the selected text into a numbered list. Example:
- First of all ...
- Next ...
- Finally ...
outdent icon
Decrease Indent
Decreases the indent of a paragraph. To decrease the indent of a paragraph, click on the "Decrease Indent" icon. Each consecutive click will move text further to the left.
indent icon
Increase Indent
Increases the indent of a paragraph. To increase the indent of a paragraph, click on the "Increase Indent" icon. Each consecutive click will move text further to the right.
quote-left icon
Block quote
Block quote is a block-level element that can be used to set-off quotations or to cite material.
superscript icon
Superscript
Formats the selected text as superscript text.
subscript icon
Subscript
Formats the selected text as subscript text.
align-left icon
Align Left
Aligns the selected text, such as a paragraph or heading, to the left margin.
align-center icon
Align Center
Aligns the selected text, such as a paragraph or heading, in the center between the left and right margins.
align-right icon
Align Right
Aligns the selected text, such as a paragraph or heading, to the right margin.
envelope icon
Insert/Edit Mailto Link
Inserts a hyperlink to an email address.
Guide to creating links
question-circle icon
Help
Displays a window with references for all icons in the toolbar.
Paragraph
Lists the block-level styles that can be applied to a selected paragraph, including headings. To apply a style from the Paragraph drop-down menu, click within the selected text and select the style from the drop-down.
Styles
Lists the custom classes that can be applied to a selected paragraph, including headings. To apply a style from the Paragraph drop-down menu, highlight the selected text and select the style from the drop-down. NOTE: classes on the "Styles" drop-down menu are toggle-based.
image icon
Insert/Edit Image
Allows users to insert or edit an image on a page.
Guide to Inserting Images
Guide to Editing Images
youtube-play icon
Insert/Edit Video
Allows users to insert a video on a page by pasting a link from YouTube.
Note: Do not use this feature. Instead add a "Video Embed" component to your page. Do not upload videos directly to Modern Campus CMS.
—
Insert Horizontal Line
Adds a horizontal line to the page.
Insert Line Break
Inserts a line break into the text. This pushes text directly to the next line without separating the text.
Ω
Insert Special Character
Inserts a special character into the text, such as the copyright symbol or registered trademark symbol.
paragraph icon
Show Blocks
Allows users to see how blocks of content are arranged.
<>
Edit Source Code
Allows users to view and edit the HTML code for the section.
puzzle-piece icon
Insert Snippet
Allows users to insert snippets into the editable section on the page.
Guide to Snippets
atom icon
Insert Component
Allows users to insert components into the editable section on the page.
Guide to Components
table icon
Table Drop-Down Menu
Allows users to insert and edit tables. This button will bring up a drop-down menu
where all table properties are found, from inserting a new table to merging cells
and editing properties.
Guide to Tables
expand-arrows-alt icon
Maximize Content Region
Expands the editable region to fill the width of the frame window.