Zoom Web Portal
Zoom is an online meeting tool with microphones, cameras, screen sharing, and a whole lot more that can create an opportunity for active learning with real time conversations. Many of the teaching practices that you utilize in a face-to-face physical classroom setting can be tweaked and used in a Zoom meeting.
As we transition over to Zoom across campus these instructions will be fluid and can change as we discover issues, new features are added, etc. We would love your help with keeping these pages as accurate as possible. If you notice an issue or something isn't behaving like it says it should in the instructions please let us know by completing our Academic Technology Support and Training form.
Accessing Zoom For Use With Web Portal
Learn how to access Zoom for use with Web Portal.
Creating/Scheduling a Zoom Meeting With Web Portal
Learn how to create and schedule a Zoom meeting from with Web Portal.
Share Zoom Meeting From Web Portal
Learn how to share Zoom meeting information from with Web Portal.
Starting a Zoom Meeting as Host from Web Portal
Learn how to start a Zoom meeting as the host from Web Portal.
Zoom Toolbar
Learn how to manage participants, share your screen, and use the chat tool in the Zoom toolbar.
Manage Participant List
Learn how to manage the participant list in a Zoom meeting.
Sharing Your Screen
Learn how to share your screen and documents in a Zoom meeting.
Meeting and Poll Reports
Learn how to access and export meeting and poll reports.
Zoom is not to be used for the transmission of patient data, or for any clinical needs, and host accounts will only be provided to Augusta University students, faculty and staff.
Accessing Zoom From Web Portal
Learn how to access Zoom from the web portal.
You can use Zoom meetings strictly within your D2L course or using the Web Portal at zoom.augusta.edu.
Note: If you have created a free Zoom account in the past using your augusta.edu email you will need to follow the instructions for Existing Zoom Accounts.
- Within an internet browser, go to zoom.augusta.edu and click Sign In.
- You will need to authenticate your account using DUO. Once you have verified using DUO, you should be taken to the Zoom main profile page.
- From the main page, you will be able to make changes to your profile, schedule meetings, view recordings, and select your settings for your Zoom account.
Creating/Scheduling a Zoom Meeting Within Web Portal
Learn how to create and schedule a Zoom meeting from within Web Portal.
- Sign into zoom.augusta.edu. Click on the Meetings tab and then select Schedule a New Meeting button.
2. You will be taken to the Schedule a New Meeting page where you can begin to fill out the meeting options that you desire.
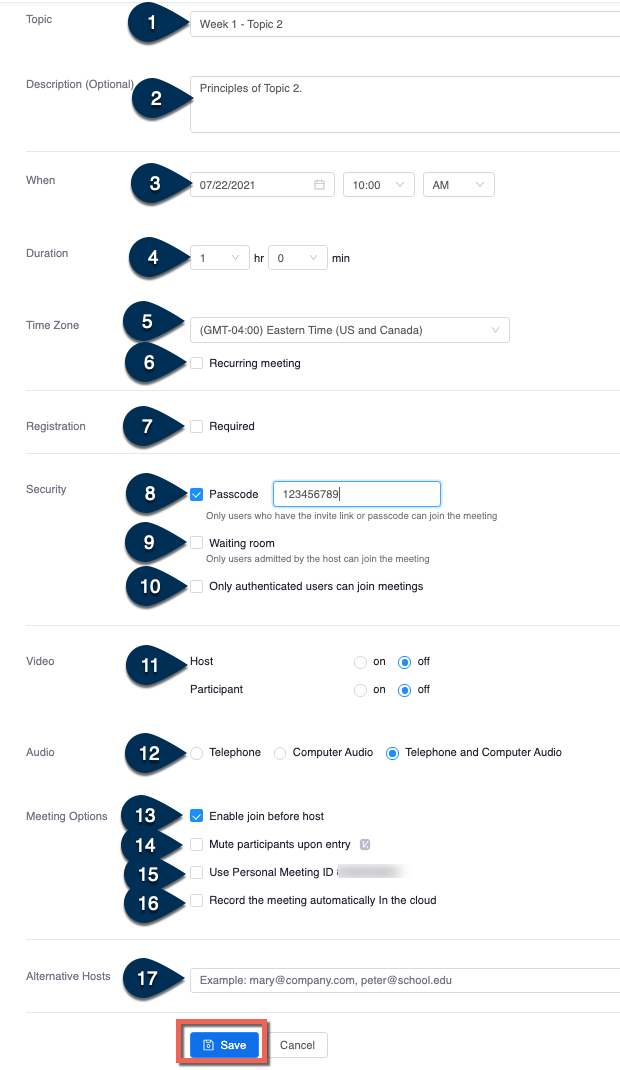
Topic: Enter in the name (or title) of the meeting. Note: Be very descriptive with the name of your meeting as it will stand out and be easier to notice in the Event Calendar widget within D2L.
Description: Enter in a description about the meeting. (This is optional)
When: Choose the date and time for the meeting. You can start your meeting at any time before the scheduled time.
Duration: Choose the approximate duration of the meeting. Note: This is only for scheduling purposes. The meeting will NOT end after this length of time
Time Zone: By default, Zoom will use your computer's time zone. Click on the drop-down to choose a different time zone.
Recurring Meeting: Choose if you would like a recurring meeting, i.e. the meeting ID will remain the same for each session. If checked, you will then have the options for Recurrence (Daily, Weekly, Monthly), Repeat every (Days/Weeks/Months), and End date (Specific date or 1-20 occurrences).
Registration: Allows you to have your participants register with their e-mail, name, other questions, and custom questions.
Host Video: Choose if you would like the host video on or off when joining the meeting. Even if you choose off, the host will have the options to start their video after joining the meeting.
Participant Video: Choose if you would like the participants' video on or off when joining the meeting. Even if you choose off, the participant will have the option to start their video after joining the meeting.
Audio Options: Choose what audio options you want to allow for the meeting (Telephone, Computer Audio, or Both)
Require Meeting Password: You can select and input your meeting password here. Participants joining the meeting via typing in your meeting ID will be required to input this password before joining your scheduled meeting. Those joining via the "join meeting URL" will not be required to enter the password as it is included in the link.
Enable Join Before Host: Allow participants to join the meeting without you (host) or before you (host) join.
Mute Participants Upon Entry: If join before host is not enabled, this will mute all participants as they join the meeting.
Use Personal Meeting ID: Check this if you want to use your Personal Meeting ID. If not selected, a random unique meeting ID will be generated.
Enable waiting room: Allows the host to control when participants join the meeting by placing them in a waiting room.
Record the meeting automatically: Check this if you want the meeting to be automatically recorded when you join the meeting as the host. You will have the option to record the meeting locally on your computer or in the cloud.
Alternative Hosts: Enter the email address of another Zoom user with a Pro license on your account to allow them to start the meeting in your absence.
- When you are done setting all of your meeting options, click the Save button.
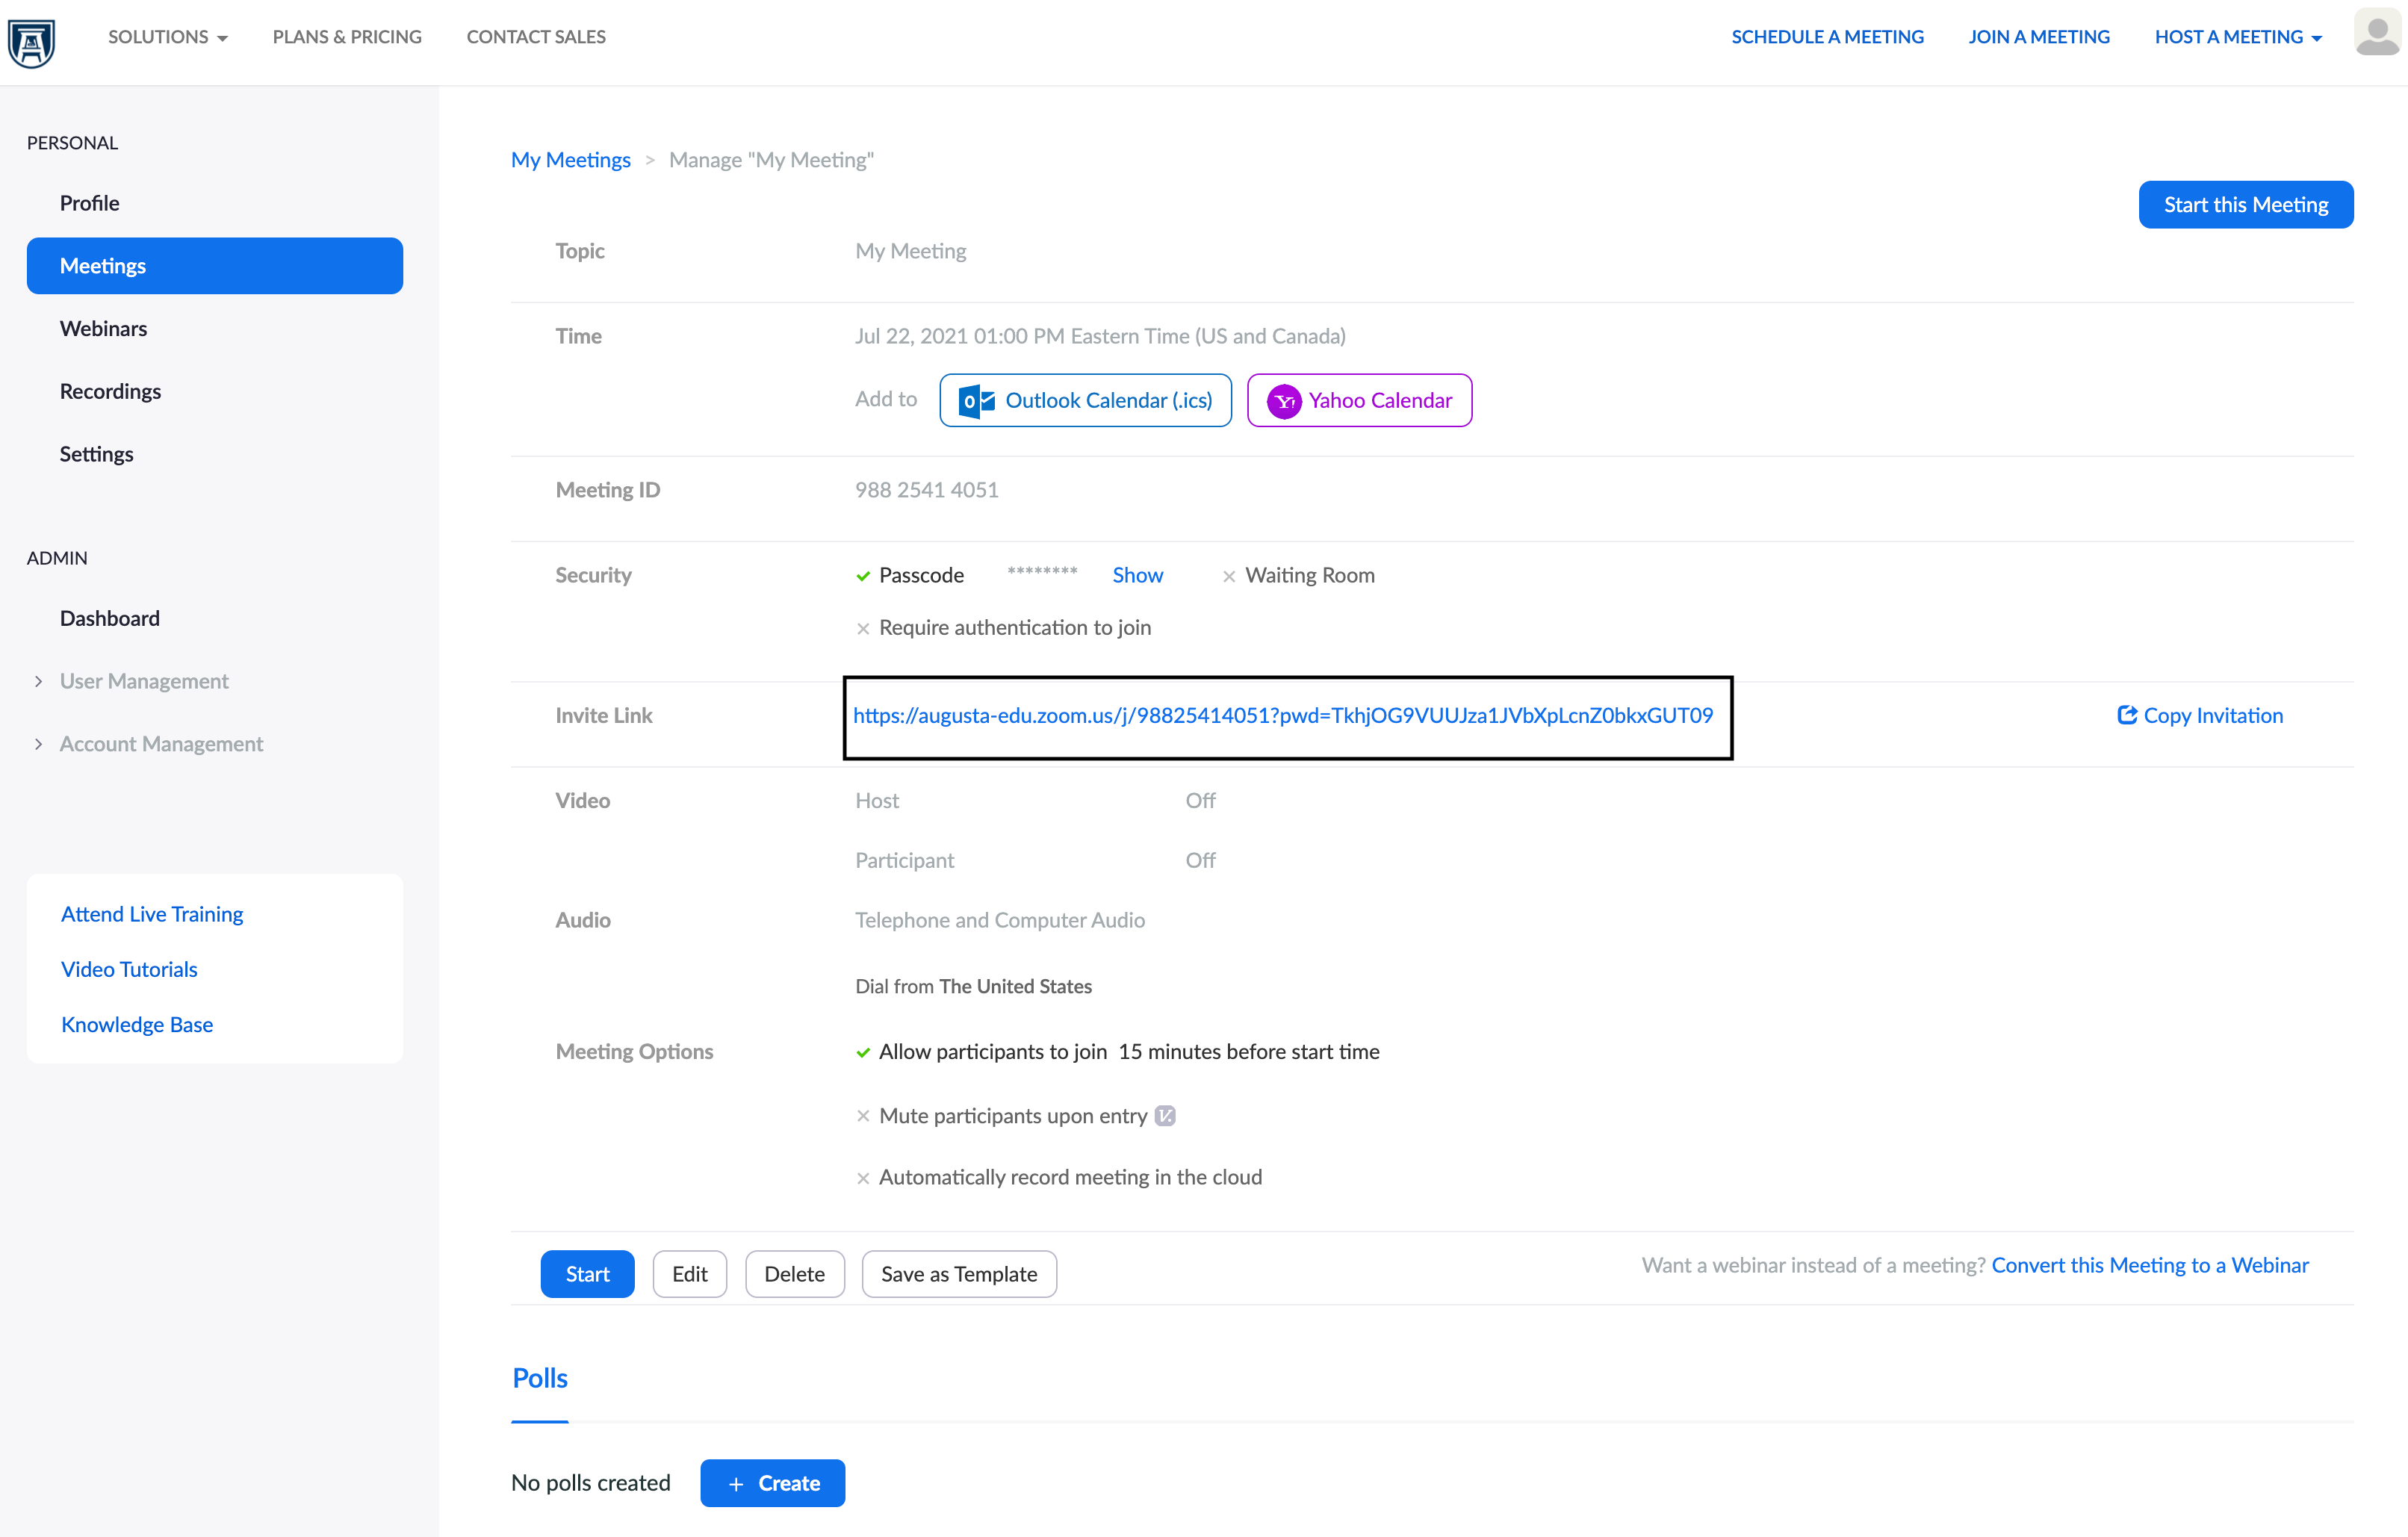
- You will then see the meeting information page. This page will show you what settings you have applied to the meeting. It will also provide you ways you can invite attendees to your meeting by giving you the "Join URL" or you can "Copy the invitation" of the meeting to email to participants. From this screen is where you can also delete, edit, or start the meeting. NOTE: D2L will automatically generate a calendar event for your Zoom meeting and put it in your D2L Course Calendar. To get back to the main D2L Zoom page click the Course Meetings link at the top. You will then see your meeting listed under the "Upcoming Meetings" tab. This is also where you can Start or Delete the meeting. To go back to the meeting information page just click on the title or "Topic" of the meeting.
Share Zoom Meeting From Web Portal
Learn how to share Zoom meeting information from Web Portal.
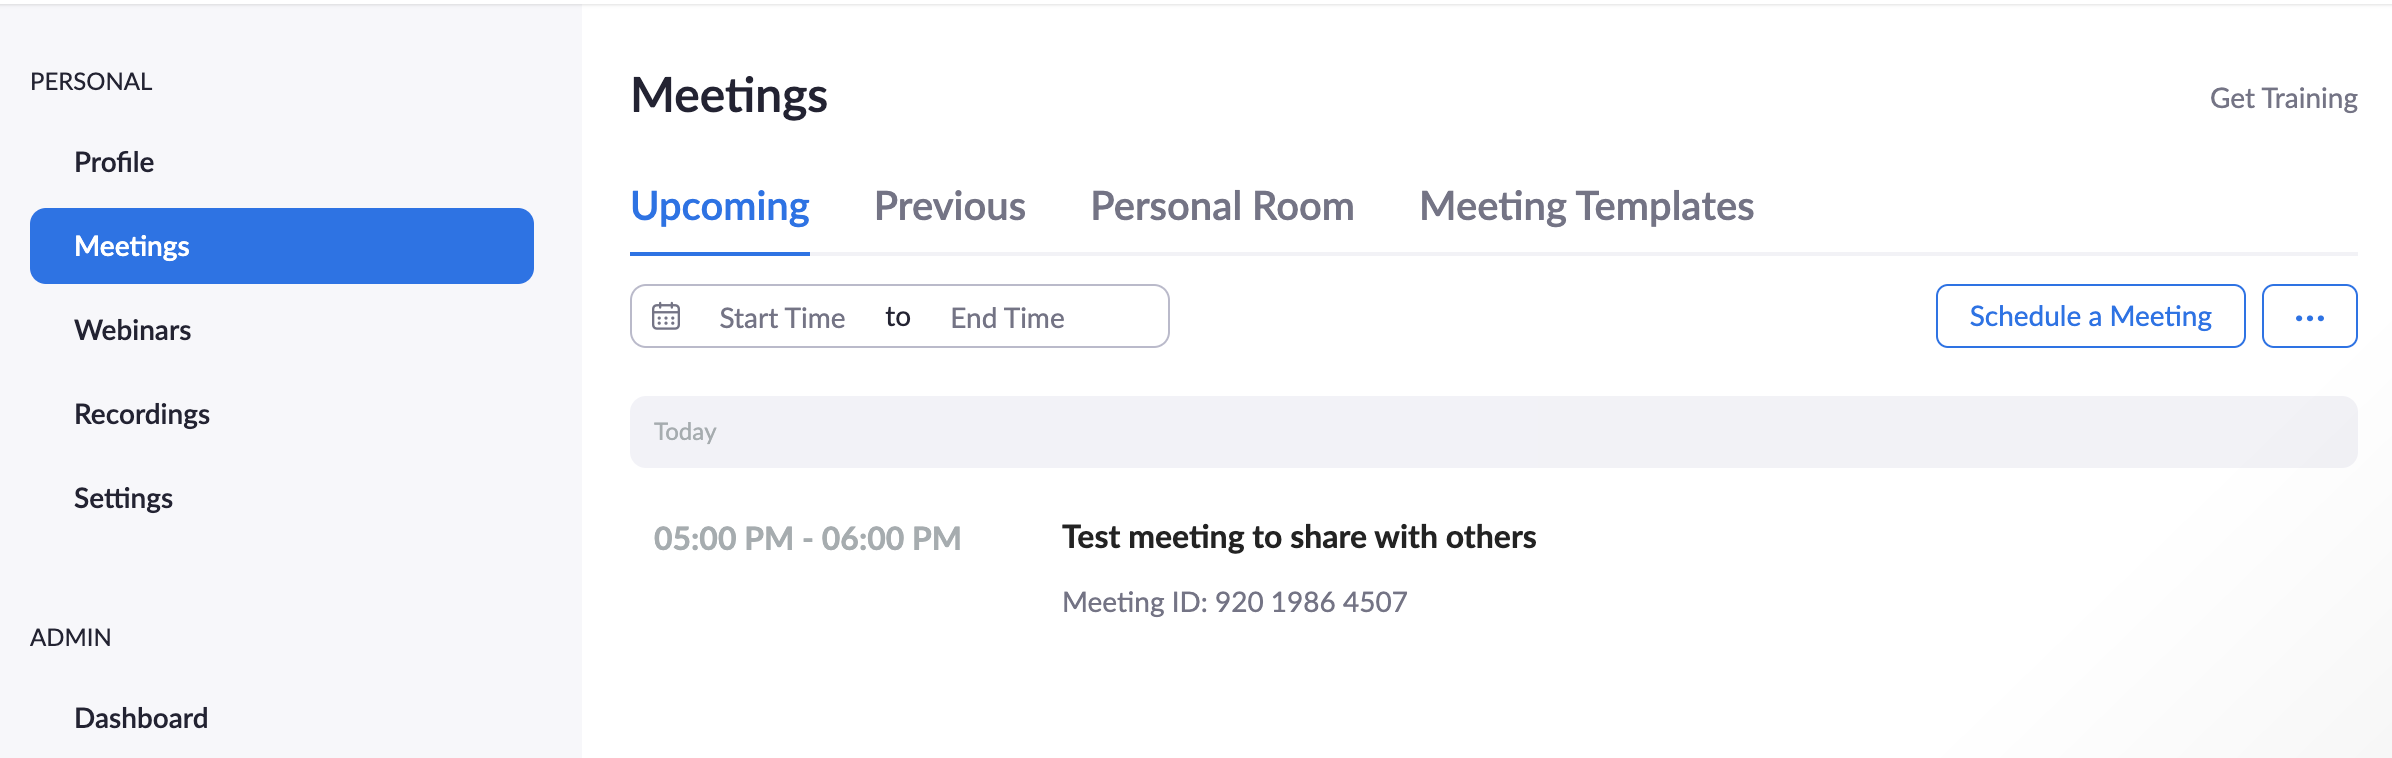
1. Sign into zoom.augusta.edu.
2. Click on the Meetings tab and find the meeting you need to share. Click on the meetings name. Example: Test meeting to share with others.
3. Scroll to Invite Link and at the far right, select Copy Invitation. Create an email or calendar invite to share with people who needs to attend the meeting.
Starting a Zoom Meeting as Host from Web Portal
Learn how to start a Zoom meeting as the host from Web Portal.
- Sign into zoom.augusta.edu
- Once at this home screen you will see a listing of all your upcoming meetings. Find the meeting you want to start and click the Start button for that particular meeting. This is also where you can delete a meeting you have created. Just find the meeting you want to delete and click the Delete button for that particular meeting.
Install Zoom App
- When you click the meeting link or the start button it will attempt to launch the Zoom meeting. If you don't have the Zoom desktop application installed, you may need to click the link in the window that says "download and run Zoom".
- It will download a Zoom installation file (.exe for Windows or .pkg for Mac). Click to run the installation file to install the Zoom app on your computer.

Audio Conference Options
Once the Zoom app is installed on your computer it should launch the meeting. It will prompt you to choose which audio option you want to join the meeting with.
Join By Computer Audio
The default selected option is to join by Computer Audio. This option is always free and it works in the Zoom app for desktop as well as your smartphone mobile device app as well. You will just need a microphone (built-in, USB, or inline) as well as speakers or headphones. If you want to test your microphone and speakers before joining you can click the link that says Test Computer Mic & Speakers. If you'll always join Zoom meetings via the Computer Audio then you can check the box to Automatically join audio by computer when joining a meeting. Once you are ready to join by computer audio you'll just click the Join Audio Conference by Computer button.
Join by Phone Call
The other audio option is to join via a Phone Call. You can join a Zoom meeting via teleconferencing/audio conferencing (using a traditional telephone). This is useful in occasions where:
- you do not have a microphone or speaker on your PC/Mac
- you do not have a smartphone (iOS or Android) while on the road, or
- you cannot connect to a network for video and VoIP/computer audio
- You can choose what country (from the drop-down menu) you are calling from and it will provide you toll numbers that you can dial. If you dial a toll number, your carrier rates will apply.
- You will then be prompted to enter the Meeting ID (9 or 10 digit number) provided to you by the host, followed by the # key.
- You will then be prompted to enter in your unique Participant ID. This only applies if you have joined on the computer or mobile device or are a panelist in a webinar. Press # key to skip.
For more detailed information about joining by teleconference/audio conferencing please visit zoom support.
Zoom Toolbar (Manage Participants, Share Screen, Chat)
Learn how to manage participants, share your screen, and use the chat tool in the Zoom toolbar.
Zoom Toolbar
Below you will learn about the different options you have within the host controls toolbar when you are in a Zoom meeting. You can also find more information about the host controls within a meeting at support.
Microphone: This button will Mute and Unmute your microphone. Also if you click the up arrow next to the mic icon you will have options to choose which microphone you want to use and which speakers you want to use. You will also have the option to leave the computer audio if you no longer want to use your computer audio for the meeting. You would then click Join Audio button that appears in the toolbar and choose to rejoin via Computer Audio or you could change to join by Phone Call. You can also pull up audio options from here if you want to test your microphone or speakers.
Video: This will start and stop your video camera feed if you have a video camera connected to your computer or through your smartphone or tablet. If you click the up arrow next to the video icon you can choose which camera you want to have selected (if you have multiple cameras connected) as well as choose other video settings.
Invite: Allows you to invite people into your meeting while the meeting is occurring. You can invite by email or you can invite a room system (H.323/SIP). You can also copy the URL of the meeting or copy the invitation of the meeting to send to someone.
Manage Participants: Clicking will open and close the participant window that shows you the list of participants who have joined your meeting. You have lots of other options within the participant list that will be covered in the Manage Participant List section.
Polls: Clicking this allows you to create, edit, and launch your polls. The options to create or launch polls will open up the Zoom web portal in your default browser. See the Polling section for more information.
Share Screen: This is where you can share your computer screen to the participants in your meeting. You will have the option to share your entire desktop screen, a whiteboard, an iPhone/iPad that you may have connected, or a specific window, document or application that you may have open on your desktop. If you click on the up arrow next to the Share Screen icon you can choose to set it to only "One participant can share at a time" or "Multiple participants can share simultaneously". You can also go into advanced sharing options where you can choose who can share (only host or all participants) and who can start sharing when someone else is sharing (only host or all participants). See the Sharing Your Screen section for more information.
Chat: Clicking will open and close the chat window where you can chat with all participants or to specific people. See the Chat Tool section for more information.
Record: Clicking this button will allow you to choose to record the meeting locally to your computer or to the cloud. See the Recording section for more information.
Breakout Rooms: Clicking this button will allow you to create breakout rooms to send your participants to for discussion and collaboration in smaller groups. See the Breakout Rooms section for more information.
End Meeting: Clicking this will prompt options to end the meeting. You'll get an option to "End Meeting for All" or "Leave Meeting" where only you will leave the meeting.
Note: If you are the host, you will need to assign someone else as host before you click Leave Meeting.
Manage Participant List
Learn how to manage the participant list in a Zoom meeting.
Manage Participant List
As the host of the meeting, you have lots of options regarding managing your participants.
- Mute All: This button will mute all of the participants in the participant list.
- Unmute All: This button will unmute all of the participants in the participant list.
- More: This button will give you more options such as
- Mute participants upon entry
- Allow participants to unmute themselves
- Play enter/exit chime
- Lock Meeting: Lock meeting will prevent anyone new from joining the meeting.
To the right of each participant's name you will see a microphone icon and a video icon. These icons will allow you to turn on/off individual participants microphones or video cameras.
If you hover over an individual participant you will see options to Mute/Unmute their microphone as well as a More button.
If you click on the More button you will have options to:
- Chat: Starts a private chat with that participant.
- Ask to Start (or Stop) Video: You can ask the participant to start or stop their video camera feed.
- Make Host: Makes the participant the host of the meeting.
- Make Co-Host: Makes the participant a co-host of the meeting.
- Allow Record: Allows the participant the ability to record the meeting locally.
- Rename: Allows you to rename the participant's name.
- Remove: Removes the participant from the meeting.
As a participant or host you have the ability to give nonverbal feedback to the host of the meeting and to each other. Everyone in the participant list will be able to see the nonverbal feedback that you select. At the bottom of the participant list you will see the different nonverbal feedback icons that you can choose from which are:
- Raise Hand (Participant Only)
- Yes
- No
- Go Slower
- Go Faster
- Agree
- Disagree
- Clap
- Need a Break
- Away
- Clear All (Host Only)
Sharing Your Screen
Learn how to share your screen and documents in a Zoom meeting.
Sharing Your Screen
For detailed information visit Zoom's Support Page on "How Do I Share My Screen".
Here you will be shown the basics of sharing your desktop screen, a document, or a specific window or application that you have open on your computer.
- To share your screen, click the Share Screen button located in your meeting toolbar.

2. Select the screen you want to share. This is where you can choose from several options. You can choose to share the entire Desktop screen, a whiteboard, an iPhone/iPad screen, or an individual application, window, or document that is already open on your computer. So to share a PDF, Word document, PowerPoint document, etc., you would open that document on your computer and then choose to share your screen and select that document to share.
3. Optional additional settings you can choose are to "Share computer sound" and "Optimize for full screen video clip". Sharing the computer sound will share any sound played by your computer. The optimize for full screen video clip should be selected when you want to share a video clip in full screen mode.
Once you have chosen what you want to share, the meeting controls will move into a window that you can drag around your screen. You can see in the example below I chose to share a Word document that was open.
The meeting controls toolbar have the following options during a screen share session:

- Mute/Unmute: Mute or unmute your microphone.
- Start/Stop Video: Start or stop your in-meeting video camera feed.
- Manage Participants: View or manage the participants (if you are the host).
- Polls: Create, edit or launch your polls.
- New Share: Start a new screen share. You will be prompted to select which screen/application you want to share again.
- Pause Share: Pause your current screen share.
- Annotate: Use screen share tools for drawing, adding text, etc.
- More: Hover over this button for additional options such as:
- Chat
- Breakout Rooms
- Invite
- Record on this computer
- Record to the cloud
- Disable participants annotation
- Hide Video Panel
- Audio Options...
- Video Settings...
- Optimize Share for Full-screen Video Clip
- End Meeting
To annotate over a screen share session, click on the Annotate button in the screen share toolbar.
You will then see the Annotate toolbar appear.
The different tools on the annotation toolbar are:

- Mouse
- Select
- Text
- Draw
- Spotlight/Arrow: Turn your cursor into a spotlight or arrow.
- Eraser
- Format: Change the format options of the annotation tools.
- Undo
- Redo
- Clear
- Save: This allows you to save all annotations on the screen as a screenshot. The screenshot is saved to the local recording location.
To stop a share screen session, click the Stop Share button in the screen share toolbar.
Chat Tool
Learn how to use the chat functions in a Zoom meeting.
Chat Tool
For detailed information visit Zoom's Support Page on "In-Meeting Chat".
The Chat tool allows you to send chat messages to other users within a meeting. You can send a private message to an individual user or you can send a message to the entire group. As the host, you can choose who the participants can chat with or to disable the chat entirely.
Access the Chat ToolClick on the Chat button in the meeting toolbar.

The chat window will then open on the right. You can type a message into the chat box at the bottom or click on the drop down next to To: if you want to send a message to a specific person. As a host the More drop down will give you options to save the chat, share a file in the meeting, and you can choose who attendees can chat with (host only or everyone).
Share a File in ChatTo share a file in the chat window, click on the More button and choose Share file in meeting.

You will then need to browse to the location of the file you want to share, select it and choose to open it. Your file will then upload to the chat and will give you a message that it sent successfully. The participants of the meeting will then see the option in their chat window to download the file locally to their computer.
Every time you receive a new chat message and the chat window is closed or not visible, the chat button in the toolbar will flash orange and remain orange until you view the chat.

When you create a private chat message with just one person it will have the word "Privately" in red and parenthesis within the whole chat window and it will say who it is from and who it is to.

Polling
Learn how to create and run polls in a Zoom meeting.
Polling
For detailed information visit Zoom's Support Page on "Polling for Meetings".
The polling button in the meeting toolbar allows you to create multiple choice polling questions for your meetings. You will be able to launch the poll during your meeting and gather the responses from your attendees. You also have the ability to download a report of polling results after the meeting.
Note: Currently during the meeting you are not able to see how each individual responded to the poll. You can see it in the reports after the meeting is over. This request to see how individual responded during a meeting has been made and will be a feature in the near future.
When you are in the meeting, to create and add a poll, click on the Polls button in the meeting toolbar.

The poll window will appear. Click on Add a Question button.
This will launch the Zoom web portal in a browser where you can create your poll.
- Enter a title for the poll and type your first question. You can mark the question as a single choice or multiple choice question.
- Type in answers to your question.
- If you want to add another question, click the Add a Question link to create a new question for that poll.
- When you are done creating your questions click the Save button.
When you go back into the Zoom meeting you will see your poll you just created. To launch the poll to all of the meeting participants click the Launch Polling button. When the poll is launched the participants can then begin responding. When they submit their answers you will see the results of how the overall group responded to the poll questions. When you are ready to close the poll, click the End Polling button. Once the polling has ended, you as the host have the option to share the results with the rest of the participants. To share results, click the Share Results button. If you want to re-launch the poll because maybe not everyone was able to respond in the time allotted you can click the Re-launch Polling button.
Breakout Rooms
Learn the ins and outs of utilizing breakout rooms in Zoom.
For additional information visit Zoom's Support Page on "Managing Breakout Rooms".
Breakout rooms allow you to split your Zoom meeting in up to 50 separate sessions. The meeting host can choose to split the participants of the meeting into these smaller groups automatically or manually, and can switch between session at any time. Breakout room participants have full audio, video and screen share capabilities. You can also pre-assign participants to breakout rooms when you schedule your meeting instead of doing it live during the meeting.
Limitations
- Only the host can assign participants to breakout rooms.
- Co-hosts can leave and join any breakout room only if they join a breakout room assigned to them by the host.
- Users joined into a Zoom meeting from the Zoom Mobile App can participate in breakout rooms, but cannot manage them.
- Users joined using Chromebooks/Chrome OS or Zoom Rooms are unable to join breakout rooms, but the main meeting room can be used as an alternative space for these users.
- If the meeting is being cloud recorded, it will only record the main room, regardless of what room the meeting host is in. If local recording is being used, it will record the room the participant who is recording is in. Multiple participants can record locally.
- You can create up to 100 breakout rooms with up to 1000 participants in each room.
Breakout Rooms
Learn how to create and manage breakout rooms during a meeting.
The instructions below will walk you through how to create breakout rooms while you are within a Zoom meeting.
For more detail and further instructions, visit Zoom's support page on Managing breakout rooms.
- To create breakout rooms, click on the Breakout Rooms button in the meeting toolbar.

2. Select the number of rooms you would like to create, and how you would like to assign your participants to those rooms. Selecting Automatically will let Zoom split your participants up evenly into each of the rooms. Selecting Manually will allow you to choose which participants you would like in each room. When finished selecting those options, click Create Breakout Rooms.

3. If you choose for Zoom to automatically assign the participants to the room, that will occur instantaneously. If you choose to manually assign participants to the rooms you will now have to assign them to the rooms. To do so, select the Assign link next to the room you wish to assign participants to and select the checkbox next to each participant you wish to assign to that room.
4. Once you are finished assigning participants to the rooms and are ready to begin the breakout rooms, click the Open All Rooms button.
Pre-assign Breakout Rooms
Learn how to pre-assign breakout rooms ahead of your Zoom meeting.
If you want to assign your breakout rooms ahead of your meeting you can do that. Right now you can only do this from within the Zoom Web Portal. You cannot pre-assign breakout rooms from within your D2L course (Navbar > More > Portals >Zoom). From within the web portal you will access your meeting and edit the meeting. You'll have two options after selecting the "Breakout Room pre-assign" feature for the meeting. You can create the breakout rooms and assignments manually by hand from within the web portal OR you can use a CSV file and import it to your meeting. For small classes doing it manually by hand is manageable but if you have classes of 50 or more this can be a tedious process of entering emails in one at a time.
For more detail and further instructions, visit Zoom's support page on Pre-assigning participants to breakout rooms.
Limitations
- You can only pre-assign participants that have a Zoom account (internal or external Zoom users). This means you can't add someone to a room if they don't have an existing Zoom account.
- When pre-assigning participants manually using the web portal, you can only pre-assign internal Zoom users that are in the same account (AU Zoom account users).
- To pre-assign participants that are external Zoom users (not in AU Zoom account), you will need to use the CSV file method.
- Up to 100 rooms can be created and you can assign up to 1000 participants (using either method, manual or CSV). Keep in mind regular Zoom meetings can only host up to 300 participants. If you need a larger meeting you will need to make that request to helpdesk@augusta.edu.
Note: If you are editing a recurring Zoom meeting and pre-assigning breakout rooms you need to make sure you choose "Edit All Occurrences" when it asks you what you want to edit. You cannot pre-assign breakout rooms to just ONE instance of a recurring meeting. It won't save your pre-assigned rooms if you choose "Edit this Occurrence".
Pre-assign participants to breakout rooms using the web portal (manual process)
- Sign in to the Zoom web portal.
- Select Meetings on the left-hand side.
- You can Schedule a New Meeting or select an existing meeting that is already scheduled.
- If you are selecting an existing meeting scroll down to the bottom of that meetings page and select Edit this Meeting.

4. In the Meeting Options section, select Breakout Room pre-assign and click Create Rooms.

5. Click the + icon beside Rooms to add breakout rooms.
6. Hover over the default breakout room name and click the pencil icon to rename it if desired.
7. In the Add participants text box, you can search for participants' name by entering the full first and last name or just type their AU email address (netid@augusta.edu) and press Enter on your keyboard to add them to the breakout room. You can only add internal AU Zoom users here. To pre-assign participants that are outside our AU Zoom account you will need to import via a CSV file.
-
- (Optional) Use these options to edit your breakout rooms and participants:
- Click and drag a participant's email address to change the order.
- Hover over a participant's name to see options to move them to another room or remove them from the current room.
- To delete a breakout room, hover your mouse over the room name in the left panel and click the trash bin icon.
- (Optional) Use these options to edit your breakout rooms and participants:
8. Click Save to save your breakout room pre-assignments to your meeting.
Pre-assign participants to breakout rooms using a CSV file
For larger courses and to pre-assign users that are outside of our AU Zoom account you will want to use a CSV file. The steps below will walk you through downloading the CSV template file, formatting the CSV file, and applying it to your meeting.
Step 1 - Download CSV template file from Zoom
- Sign in to the Zoom Web Portal.
- Click Meetings on the left-hand side.
- You can Schedule a New Meeting or select an existing meeting that is already scheduled.
- If you are selecting an existing meeting scroll down to the bottom of that meetings page and select Edit this Meeting.
- In the Meeting Options section, select Breakout Room pre-assign and click Import from CSV
5. Click download to download a sample CSV file you can fill out.

6. Open the CSV file with spreadsheet software like Microsoft Excel or something comparable.
7. Fill in the Pre-assign Room Name column with the breakout room name, and the Email Address column with the assigned participant's email address. You can copy/paste student's email addresses from a course roster that you previously downloaded or use data from another list you have. Important: When assigning participants, make sure you use their "@augusta.edu" email address. Also, DO NOT alter the names of the column headers "Pre-assign Room Name and Email Address". These need to be left as is or else you will get errors when attempting to upload the file to your meeting.

8. Save the file in CSV format. DO NOT save it as a normal Excel file. It needs to specifically be in CSV format.

9. Drag and drop the CSV file or browse to find the CSV file on your computer to import it into your meeting within the web portal. Zoom will verify that the email addresses all have a Zoom account.
10. Zoom will verify that the email addresses all have a Zoom account. You should then see all of our breakout rooms in the left panel and when you click on each room you will see the participants you have assigned to those rooms. Click Save.

11. Click Save again to save your meeting. Now, once you are within your meeting then you will click on the Breakout Room button in the Zoom toolbar to bring up your assigned breakout rooms and to then Open All Rooms. If some students don't happen to get pre-assigned properly then you can manually assign them prior to opening the rooms. Likely reasons why participants don't get properly assigned to rooms is that they don't login to the Zoom application with their AU Zoom account therefore Zoom doesn't see their AU email address to properly put them in the assigned room. To properly login to the Zoom app please view instructions on How to sign into zoom.augusta.edu.
Starting a meeting with pre-assigned breakout rooms
- Start the meeting that has the pre-assigned breakout rooms applied.
- When all of your participants are present in the meeting, click Breakout Rooms in the meeting controls to access the breakout rooms you created. Those that are present in the meeting should get assigned properly to their rooms. If you open the Breakout Rooms button too early (i.e. when you immediately enter the meeting as the host) your students likely won't get assigned properly to your rooms. Only the students that are present in the meeting when you click Breakout Rooms will get assigned properly. Any student who joins the meeting after you have clicked that button they will not get properly assigned.
- If a participant who comes in late is not assigned to the breakout room you specified you can click the Recreate button and choose Recover to pre-assigned rooms. This will recover the pre-assigned rooms and put everyone who is presently in the meeting in their appropriate breakout rooms.
Manually assign a participant who doesn't get assigned properly to their pre-assigned breakout room
If during your meeting you click on the breakout room button in the Zoom toolbar and click on the Open All Rooms button in the breakout room window and you find that a participant has not been assigned to a room you can manually assign them to a room.
- Once you have opened up your breakout rooms if you see a category at the top of the breakout rooms window that says Unassigned it will show you what participants have not been assigned to a breakout room.
- Hover your mouse over a participant's name and select the Assign To option and then select which room you want to assign to them.
Recording
Learn how to record your Zoom Meetings.
Recording
For detailed information visit Zoom's Support Page on "Cloud Recording".
If you want to record your meeting you will have the option to record the meeting locally onto your computer or record to the cloud. Cloud recording is the default recording option for all faculty and staff accounts. Students will only have the option to record locally.
Enabling Cloud Recording for your Zoom Account
1. Log into zoom.augusta.edu.
2. Click on Settings on the left hand side.
3. Click on the Recordings tab and select if you want to record locally or on cloud.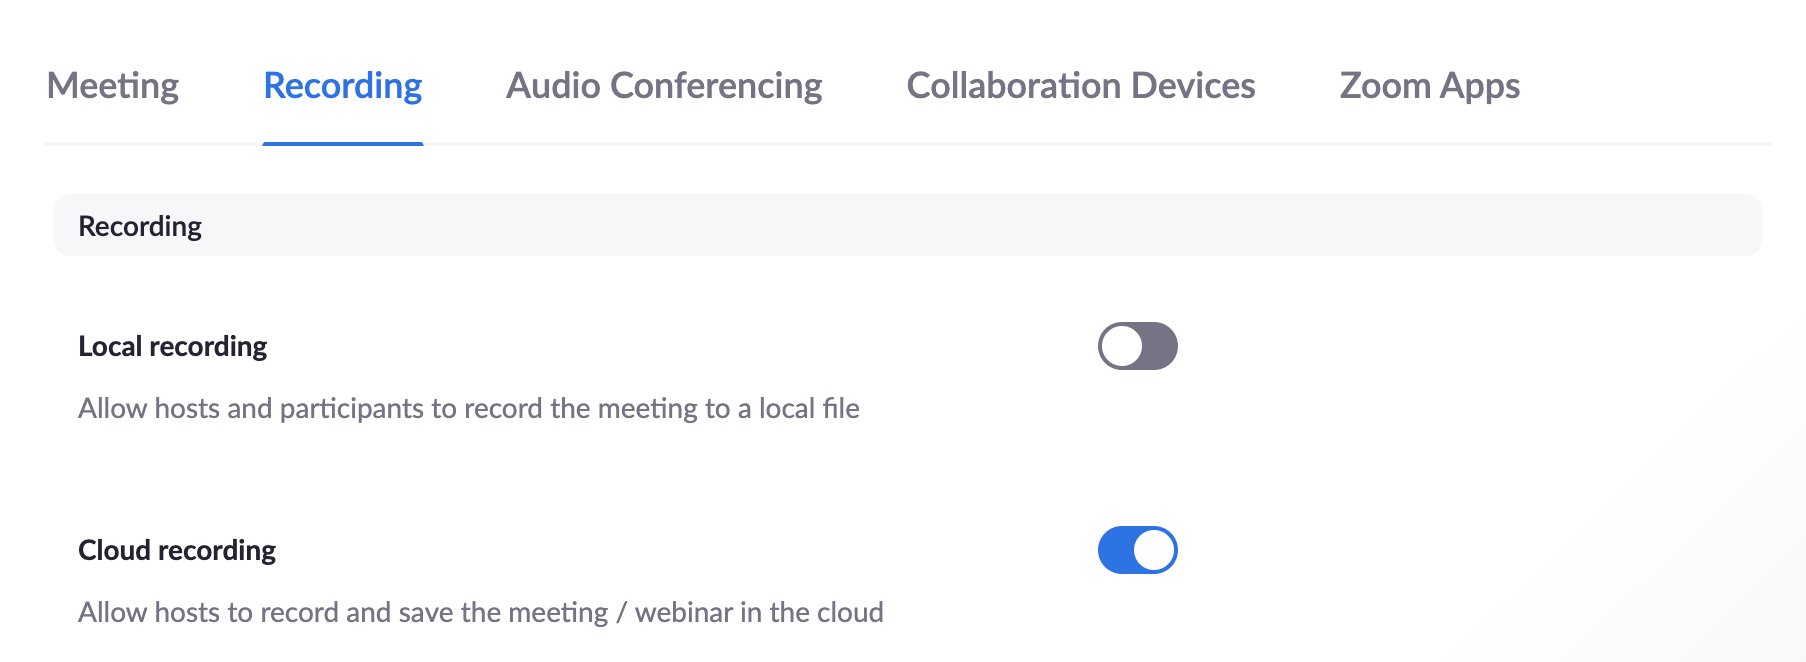
Record to Your Computer (Local Recording)
Local recording allows users to record meeting video and audio locally to their computer. The recorded files can then be uploaded to file storage websites like Box or Google Drive.
Start a Local Recording
- Click the Record button in the meeting toolbar.

2. A menu prompt will appear, select Record on this Computer.
3. Hosts will see the following recording indicator in the top left corner when the recording has started.
4. In the participants window it will also display a recording indicator next to the user who is actively recording.
5. Once the meeting has ended, a prompt will appear stating "You have a recording that needs to be converted before viewing." Wait for the recording to convert before it can be accessed. Note: If the meeting unexpectedly shuts down or the conversion process is interrupted, the recording files could become corrupted and non-recoverable.
6. Once the conversion process is complete, the folder containing the recording files will automatically open.
Recording File Formats,
- MP4: Audio/Video format the Zoom recording uses. This is named "zoom_0.mp4" by default. Each subsequent recording is then in sequential order: zoom_0, zoom_1, etc.
- M4A: Audio format the audio-only file uses. This is name "audio_only.m4a" by default. Each subsequent recording is in sequential order: audio_only_0, audio_only_1, etc.
- M3U: Playlist file to play/load all individual MP4 files (Windows only)
- Chat: Standard text or .txt file. This is named "chat.txt" by default.
Cloud Recording
When you record a meeting a choose Record to Cloud, the video, audio, and chat text are recorded in the Zoom Cloud. The recording files can then be downloaded to a computer or streamed from a browser via HTML5 or Flash. Please note: Students will not have the capability to record to the cloud, they are only able to record locally.
Start a Cloud Recording
- Click the Record button in the meeting toolbar.
- A menu prompt will appear, select Record to the Cloud.
- To stop the recording press Stop Recording or end the meeting.
Once the recording has been stopped, the recording must be processed before viewing. Zoom will send an email to the host email address when the processing is completed. In that email will be links to view the recording as well as share the recording with others.
Adjusting Zoom Cloud Recording Settings
Learn how to adjust your Zoom Cloud Recording Settings.
Within Zoom, you may want to adjust the cloud recording settings to receive the correct format of recording that you desire. By default, your account likely will render the following types of recordings:

- Record active speaker with shared screen
- Record gallery view with shared screen
- Record active speaker, gallery view, and shared screen separately
- Record an audio only file
Meeting and Poll Reports
Learn how to access and export meeting and poll reports.
There are a few different types of reports that you can access regarding your Zoom meetings, a Meeting Report and a Poll Report. A meeting report will tell you who attended your meeting, what time they joined, what time they left, and for how long they were in your meeting. A poll report will show you the specific results of your polls that you run in your meeting and how each participant responded.
- Log-in to D2L (lms.augusta.edu) then access your course.
- Select Zoom.
- Select Previous Meetings tab.

4. Select Report for which meeting you want to view a report.
5. You will see two tabs, a Meeting Report tab and a Poll Report tab.

6. The Meeting Report tab will show you your meeting attendance information. You can export these results to CSV if you desire.
7. The Poll Report tab will show you your results from the polls you conducted during the meeting. You can export these results to CSV if you desire.